User Guide on How to Use
Advanced Floating Content
Thank you so much for purchasing Advanced Floating Content from codecanyon.
- Version: 3.7.4
- Author: CodeTides
- Created: 4 January, 2015
- Update: 16 July, 2022
If you have any questions that are beyond the scope of this help file, Please feel free to email via Item Support Page.
About
Advanced Floating Content is usefull and powerfull plugin can be used for multipurpose, if you want to show a content or banner or any advertisement Ads or any type of promotional content at fixed defined position then this is the best plugin for you.
Installation
Follow the steps below to setup Advanced Floating Content Plugin in your website:
- Unzip advanced_floating_content.zip into `advanced_floating_content` folder
- Upload the `advanced_floating_content` folder to the `/wp-content/plugins/` directory on your web server.
- Click on the Plugins tab from your WordPress admin.
- Find Advanced Floating Content in the plugins list and click Activate.
- Advanced Floating Content will displayed on left side menu of Wordpress.
- You are good to go for adding your content now!
Validate Purcahse Code OR License Key
Before Using Advanced Floating Content you must have to validate your purchase code in order work properly.
- Find Advanced Floating Content on left side menu of Wordpress Dashboard
- Click on Settings Panel which will leads to license validating page of Advanced Floating Content
- Insert Your Email, Codecanyon Username and purchase code and then click on validate license button.

How to use
Advanced Floating content is made according to user preference to setup easy and quickly with few steps.
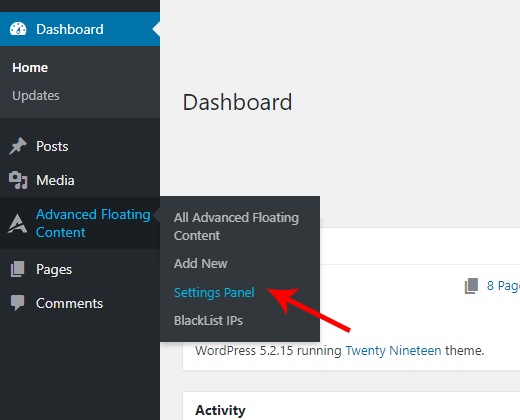
Open Advanced Floating Content
Once you are in the “dashboard”, click on the Advanced Floating Content button and a drop down list will appear. From there click on “Add New” and a new floating content page will open. See in image

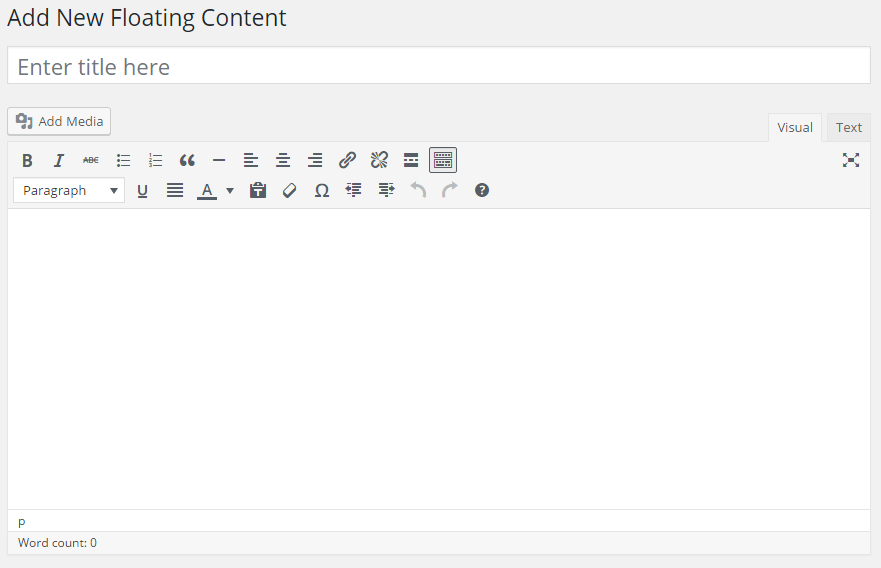
Add New Floating Content
Add title and description/content for your floating content. Title will not show in floating content , its just for refrence to create another floating content. Everything in the description field will be displayed.
Build Your Theme for the Floating Content
Here you will see two main options:

| Feature | Description |
|---|---|
Position |
Starting on with the position of the content you can choose from further options such as “Fixed” and “Absolute”. When you scroll the content will remain on a fixed location when you choose “Fixed”. By choosing “Absolute” the content can move up and down. |
Margin |
Next thing in this section comes the “Top and Bottom” and following with a “Left and Right” option too. This means that you can move the content to any side you want whether it is left, right, top or bottom. It is totally up to you which way you want the content to move on the website. You can set all that in “Margin” where you can set the directions from top to bottom and left to right. |
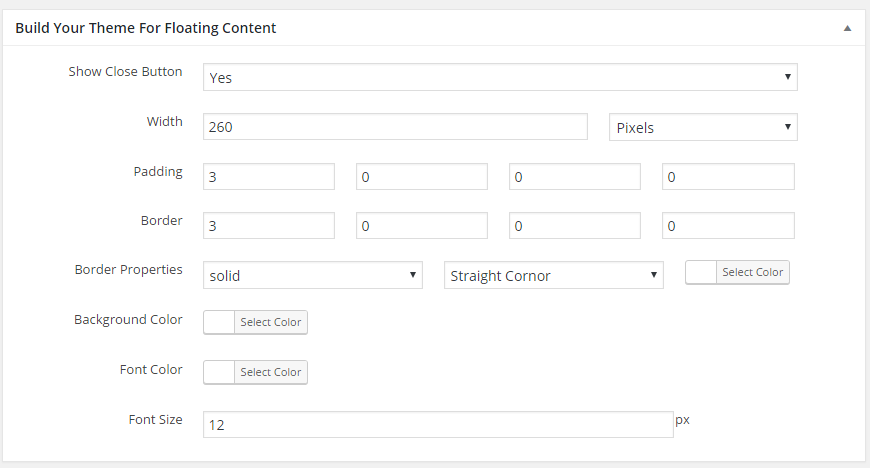
Build Your Theme for the Floating Content
You can build your own theme in this section, customize look of your content with readymade option panel. Here is the guide how you can build your own theme.
| Feature | Description |
|---|---|
Show close Button |
For displaying or hiding the content you can use the “Show close button” option. |
Width |
In width field enter the width of your floating content in pixels or percentage by selecting unit options. |
Padding |
Use padding to add gap in your floating content as you required by adding top, left, bottom, right padding. |
Border |
Use Border size for top,left,bottom,right. |
Border Properties |
Various options will appear in the drop down list once you click in the empty rectangle of the “Border Properties”. Whether you want a straight corner of a round one, you can easily select it. |
Background Color |
A color scheme is there for you to choose the background color from. |
Font Color |
The color of the font used is usually always chosen black but if you have chosen a dark colored background then light colored font can be selected from the color range. |
Close Button Background Color |
The Background color of the close button used is usually always chosen black but if you have chosen a colored background then can be selected from the color range. |
Font Size |
You can control how your font size shows up by changing the size from this option. |
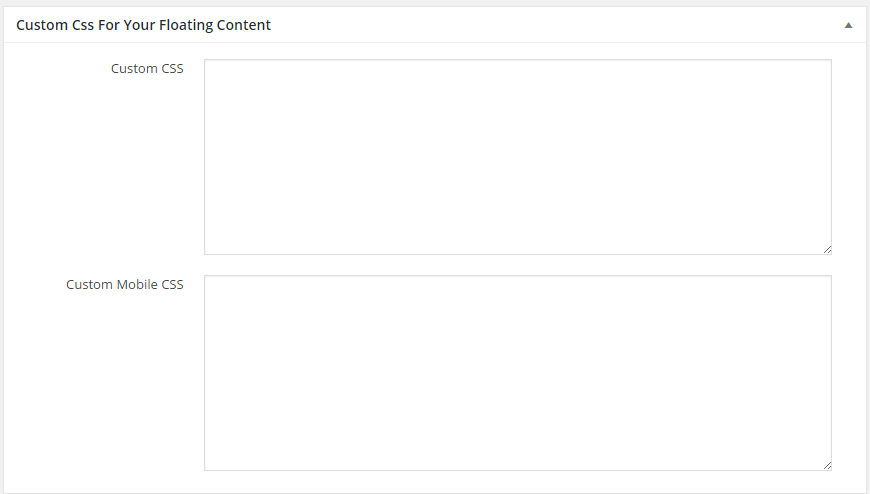
Custom CSS for Your Floating Content
You can customized your theme in the advanced way in this version of WordPress which is far better than the previous one. Continue reading.
| Feature | Description |
|---|---|
Custom CSS |
If you are thinking of adding your own touch to the theme you have decided then that is possible with this Custom CSS section. Here you can play with the theme and even customize the style of your content to give your website the style you want. |
Custom Mobile CSS |
If your website supports mobile devices then “Custom Mobile CSS” is also necessary to do. This option allows you to customize the style and theme that will be displayed in the mobile devices. It is pretty easy to deal with as it is the same as for the desktop custom CSS. |
Animate & Scehdule Your Floating Content
You can add animation to your floating content or set schdule to start and hide according to the date:
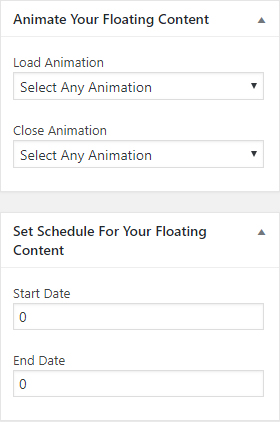
Animate Your Floating Content
Add Animation to your floating content with chosing from a various animation effects onload and onclose event for floating content
| Feature | Description |
|---|---|
Load Animation |
Chose an animation from dropdown list to trigger onload animation for floating content, Default: None |
Close Animation |
Chose an animation from dropdown list to trigger onclose animation for floating content, Default: None |
Schedule Your Floating Content
Set Start / End Date for your floating content and it will automatically display and hide according to their start and end date.
| Feature | Description |
|---|---|
Start Date |
Chose starting date for your floating content to display according to date, Default: None |
End Date |
Chose ending date for your floating content to hide according to date, Default: None |
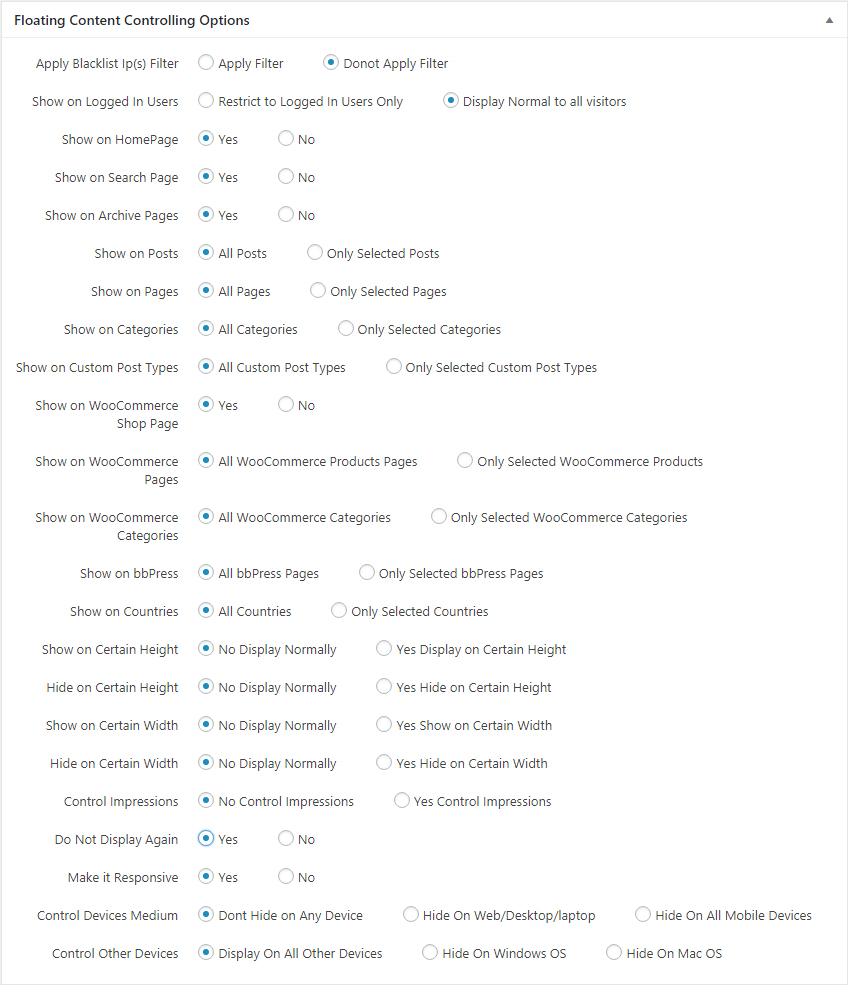
Floating Content Controlling Options
Control where your content appears from changing the following settings:
| Feature | Description |
|---|---|
Apply Blacklist IP(s) Filter |
Make a list of bad IP Addresses and apply filter on them to hide your floating content to bad / ban IP addresses, Default: No |
Show on LoggedIn Users |
Restrict your content to display only to logged in users and normal visitors/users who are not logged in will not able to access your content, Default: Display normal to all visitors |
Show on HomePage |
This feature allows you to display your content on home page if you make it active and by disabling it will hide from homepage. Default: Yes |
Show on Search Page |
You can choose if you want to display the content on search page by choosing yes or no. Default: Yes |
Show on Archive Page |
You can choose if you want to display the content on archive pages by choosing yes or no. Default: Yes |
Show on Posts |
“All Posts” allow you to show all your posts that are published. You can also select manually the posts you want to show from “Only Selected Posts”. |
Show on Pages |
You can do the same with the selection of pages whether you want to show on every page or selected ones. |
Show on Categories |
On your preference you can select “all categories” or “only selected categories” for your content. |
Show on Custom Post Types |
From this option you can decide if you want the content on all custom post types or selected ones. |
Show on WooCommerce Landing Page |
To Display on WooCommerce Landing/Shop page or not, Default: Yes |
Show on WooCommerce Products Page |
The products you want to show can be controlled by using the show all products or selected ones by the WooCommerce options. Default: All WooCommerce Products Page |
Show on WooCommerce Categories Page |
The WooCommerce Categories you want to show can be controlled by using the show all Categories or selected ones by the WooCommerce options. Default: All WooCommerce Categories Page |
Show on bbPress |
To display on all pages of bbPress or hide on all pages of bbPress. Default: All bbPress Pages |
Show on Countries |
To display on all countries or by seletive list of countries, Default: All Countries |
Show on Certain Height |
To Display on Certain Height it will display by scrolling and reaches to the pixels you defined for height; Default: No Display Normally |
Hide on Certain Height |
To Hide on Certain Height it will hide by scrolling and reaches to the pixels you defined for height; Default: No Display Normally |
Show on a Certain Width |
To Display on Certain Width it will display by narrowing your browser width to match your defined width; Default: No Display Normally |
Hide on a Certain Width |
To Hide on Certain Width it will display by narrowing your browser width to match your defined width; Default: No Display Normally |
Control Impression |
Count Impressions i.e count visit on page and then hide according to the impression count . Default: No Yes - Disable Floating Content after meet the criteria of counting numbers defined. No - Display without any counting impressions |
Do Not Display Again |
Do Not Show Again after closing the content, will not display again on same computer, it captures IP address so if you open site with new IP address or new computer then content will show. Default: No Yes - Disable Floating Content after close button clicked No - Display Again on refresh |
Responsive |
Choosing this makes the content auto responsive in all devices and on desktop. |
Control Devices Medium |
Control the Devices Medium i.e laptop or mobile to display or hide, Default: Don't Hide on Any Devices Don't Hide on Any Devices - Display on All Devices Laptop and Mobile Hide on Web/Desktop/Laptop - Only Hide on Web/Desktop/Laptop Hide on All Mobile Devices - Only Hide on All Mobile Devices |
Control Other Devices |
Control the Opearting Systems i.e windows and mac to display or hide, Default: Display on All Devices Display on All Devices - Display on All Devices windows or mac Hide on Windows OS - Only Hide on Windows OS Hide on Mac OS - Only Hide on Mac OS |
Support
If this documentation doesn't answer your questions, So, Please send us Email via Item Support Page
Don’t forget to Rate this plugin
Go to your Codecanyon Profile > Downloads Tab > & then You can Rate & Review for our product.
Thank You.
More Products
Checkout Our Below Premium Products


